Matt was driving north over the Bay Bridge. I was gazing out the passenger window, feeling pensive. This was two weeks ago. We’d spent the afternoon buying parts, and were eager to get back to the boat. Four tankers sat at anchor in the bay far below, in line with the current. I said it was neat how even in this modern world, boats and planes must understand and obey tides and currents and winds, etc — and how crazy it was that only cars don’t really have to make way for nature, unless it snows, or gets really windy, as it is prone to do on sections of I-80 in Wyoming. I asked Matt if he’d ever buy a diesel car, and he said that next time he’d like to, if they made a diesel something-or-other like an X-terra. He said it’d be cool to be able to work on it, and I didn’t dissuade him of the notion.
We got to talking about the differences between diesel and unleaded engines — how the power from an unleaded engine is like the power required to ride a bike with sneakers, pounding only on the downstrokes, while the power from a diesel engine is like the power required to ride a bike with clipless pedals, a nice smooth round even stroke. We were pretty proud of that metaphor. We talked about how an unleaded engine can propel a car from 0 to 60 in 5 seconds, while a diesel engine can eventually propel a car to 60 while pulling 100,000 pounds; and how unleaded fuel in a diesel engine destroys it by exploding way too early in the cylinder, pushing the piston down too soon; and how diesel fuel in an unleaded engine just won’t explode no matter how big a spark you throw at it. We were grappling with the big picture, so that the little details of our engine would make more sense when we tinkered with it later. Thinking about it all, I marveled at how not-understood the distinction between diesel and unleaded engines probably is — akin, perhaps, to asking Americans to name the 3rd president or the capital of Nigeria.
It was nearly sundown by the time we began installing the oil transfer pump. Matt in particular had been excited about the project for months, ever since he first changed the oil in the engine. That task — changing the oil — had been a bear. A total bitch. Because the drain plug was nearly inaccessible, and, at any rate, a drain pan wouldn’t fit under the engine, changing the oil the standard way wasn’t possible. Instead, it required pumping out the old oil via a long, narrow hose snaked in through the dip-stick tube, and then pumping in the new. It was such a laborious, lengthy, messy – -and apparently ineffective — solution that none of us wanted to change the oil, which is not a good thing. Hence the transfer pump. We planned to remove the drain plug, attach a valve, and connect a hose from it to the pump — so that from then on, changing the oil would require only the flip of a switch and the push of a button. it would be glorious.
But first: how do I know the pumping-through-a-hose-snaked-in-through-the-dipstick-tube method was ineffective? Two ways. First: Our engine takes 4 quarts of oil; it says so in the engine manual. So an oil change should entail removing 4 quarts of nasty black oil, and putting 4 quarts of clean oil back in. But notes in the engine logbook, kept by the meticulous previous owners, reveal oil changes of less than 4 quarts. Since 1993, the numbers look like this: 3.75 qts, 3.5 qts, 3.5 qts, 3.75 qts, 3 qts, 3 qts, 3 qts. Given how inordinately difficult it is to manually pump the oil out of the dipstick tube a little bit at a time, these numbers aren’t so surprising. But what’s the point of changing the oil if you’re not going to change all of it? It’s like only flushing the toilet partway. Second: having changed the oil on cars, I am familiar with nasty, black used oil. The nasty, black, used oil in the bottom of our engine was something else. It was sludge. Big surprise, considering how hard it was to pump the gook out through a tiny hose.
So: we screwed five bronze fittings (a 90-degree bend, a connector, a valve, another connector, and a hose fitting) together, put some bomber glue (3M’s 5200) on the threads just to be extra safe, and connected them to the spot where the drain plug had been. For what it’s worth, this was beneath the most inaccessible underside part of the engine, and required creative squirming just to get your arm in there, let alone use a wrench. After that, we mounted the pump on the bulkhead just above the engine, and connected the hoses. Then Matt wired it up. Finally, around midnight, we changed the oil by flipping a switch.
The pump hummed, and the oil level in the 4-quart container began to fall. No mess was made. Nasty, sludge-like oil did not leak anywhere, or stain any clothes. The operation took only about five minutes. When the 4-qt oil jug was empty, we turned off the pump, closed the valve, and checked the oil level with the dipstick, just to make sure everything was OK. At first, the oil level seemed low, so we wiped the dipstick clean, put it back in, pulled it back out, and inspected it again. Matt grew serious. “Oh shit,” he said, “it looks like there’s water in the oil.” I corrected him: the new oil was so clean and transparent, and we were so accustomed to looking at black, oily sludge, that the new oil, thin and golden, looked watery. But it wasn’t. And we had the perfect amount, right between the MIN and MAX lines.
I expect that our engine will be very happy with its new treatment.
Step 3: Line up the new window, drill18 holes, spread silicone all over the edge (not shown), and install it. Stand back, and take delight. Only 3 more windows to go!
Matt and I spent the last few days installing 4 new portlights (windows) in our boat. Eventually, we will also replace the small, old, brittle, cracked, (and probably-leaking) portlights too.
Step 1: Cut a 6″ x 16″ hole in boat. Begin delicately, then proceed to use larger power tools
I’m on roll, I don’t have any work until feb 16 and I’m working on the boat, and I’m on a roll, because there’s stuff, so much stuff, to do. I dropped karen off at the train station for work every day before sunrise this week, and arrived at the boat before dawn, very cold, and worked all day, short or even no lunch, many espressos. Sleeping well. There is a lot to do.
We need to save money for our trip, so being out of work feels discouraging, so I feel the need to be extremely productive on the boat, because there’s stuff that needs to get done on the boat no matter what, and if I’m using my time to fix up the boat then it’s okay that I don’t have any work. Right?
It has been cold and rainy all week, and leaking depressingly into the boat. I worked like a dog and slept like a baby every night. I don’t know that I have that much work to show for my efforts. I have no standard by which to judge, and no one to look over my shoulder and pat me on the back. Most jobs spawned unforeseen baby jobs. I hate those baby jobs.
I know that I am making progress, I know that I have been enjoying the work.
Though I have been enjoying myself, tomorrow I may rest.
In the course of the last few months, Matt and I have regularly taken pride in removing janky parts from the boat. You could say that’s how we’ve prioritized our refitting projects: by endeavoring to eliminate jankiness. Whenever we discovered a severely corroded wire or a screw that had rusted into a pile of dust, we’d throw the offending part onto the cabin floor, and yell, “Jank removed!” We took immense pride in casting off such crap from our boat. But really, like many people, we were using the term generically, and incorrectly.
Another example: Over the holidays, I heard a friend ask for a janky beer. I asked her to clarify. “You know, like Bud Light, or PBR,” she said. What she meant by janky was: thin or weak. This, too, is an incorrect usage of the term janky.
Matt and Jon and I mistakenly used the term janky to describe corroded or rusty parts — but corrosion and rust are just wear and tear, the type of decay that you expect on any boat. Truly janky stuff is a step above (or below, depending how you look at it) — parts or repairs that were improperly concieved and poorly installed — and our boat was (and still is) laden with such things.
Some recent highlights:
*Unlabeled wiring that ran from the engine, 20 feet forward to the cabin, and right back to where it came from — with corroding terminals covered in layers of soggy electrical tape rather than heat-shrink. Who calls that a fix?
*A tiny (12 gauge) corroding wire with a huge (300 amp) fuse on it. Can you say not safe?
*Dozens of unlabeled wires behind the old electrical panel all connected to the same terminal with one tiny rusted screw — such that repairing one circuit (say, the lights in the cabin) requires removing everything else just to begin. Matt got a headache just looking at it.
*Cracked hoses of the wrong size glued on to fittings without hose clamps. Was someone aspiring toward a leaking vessel or a chance to test the (formerly non-functioning) bilge pumps?
*The old engine exhaust hose, which was not only at the water line, but was glued on to an poorly attached through-hull. Was someone eager to suffocate, drown, and sink all at the same time?
*Wood screws in the deck where machine screws with nuts and washers and/or backing plates were called for. This one’s obvious, and common.
*A bilge pump screwed onto a flimsy piece of untreated plywood, mounted on two tiny wooden strips of untreated molding with two tiny woodscrews. How’s that supposed to survive — let alone work — in a wet environment?
These are the small battlefields in the search-and-destroy mission against jankiness.
Before we leave, we endeavor to have a boat in which:
**every single thing that goes through the deck (stanchions, hardware, chainplates, etc.) will go through a hole that’s been cored and filled with epoxy.
**all hoses are properly sized, fitted and hose-clamped, such that they don’t leak.
**all wiring is fused, properly sized, sealed with heat-shrink, led to its own circuit, and labeled.
In our mechanical, electrical, and plumbing-dependent world, these will be major victories.
A few heavy metal pieces of the Monitor windvane needed some welding (for strengthening and repair), so the holidays came just in time–I packed them up in my checked luggage and flew home with them.
My dad isn’t a professional welder, but as a farmer he welds frequently. Stainless steel is finicky so it usually requires a TIG welder; my dad has a MIG setup on the farm and the stainless wire he picked up was too thick besides, so it was a challenge. The welds didn’t turn out very pretty, but it works, it’s strong, and the price was right. Thanks to dad for helping us out, and props to him for making it work even with difficult conditions.
Below is a few seconds of footage of me grinding back the welds in the shop. I wish I had some footage of the welding, but I forgot to grab the video camera.
I grew up on a farm, and all my life my father has been bashing gasoline engines and lauding diesels. He wouldn’t buy any vehicle that wasn’t a diesel, and we had two 1,500 gallon diesel tanks around by the barns–one for on-road vehicles and one for the tractors. As a result, I grew up plugging the diesel suburban into an extension cord in the winter, and waiting to start the car until the glowplugs–whatever the hell they were–warmed up the engine. Meanwhile, in their gasoline vehicles, my friends could fill up at any gas station and accelerate from 0-60 in something significantly less than the 30 seconds it took in the suburban. I wrote off my father’s opinion as old-fashioned, ultra-conservative, non-progressive, and wrote off our diesel vehicles as too loud, too much work, and too slow.
I’m home now, back around my dad, and back into the diesel debate.
Never in a million years would I have guessed that one day I would know how to sail (?), that I would own a sailboat (!?) and that the sailboat happens to CONTAIN A DIESEL ENGINE (!?!). And never ever ever would I have guessed that one day I would agree with my father about the benefits of diesel engines. Don’t be mistaken: I have done my own research and come to my very own, independent conclusions. They just happen to be the same conclusions as my dad’s.
This being the holidays, time for family reconciliation, good will, etc etc, I am hereby rising above my stubborn mindset for the past three decades to admit that my father was right: diesel engines are more efficient and longer lasting than gasoline engines.
Most people don’t understand the difference between diesel and gas–that was my problem. As a result of this ignorance, nearly all americans drive less efficient, less reliable, shorter-lived vehicles while all of the countries in the rest of the world drive way more diesel vehicles than us.
These are the facts: diesel fuel has more energy per gallon than gasoline, and diesel engine are more efficient at extracting that energy than gasoline engines. As a result, diesel engines get 20-40% better fuel economy and emit 10-20% less greenhouse gas than gasoline engines1. Moreover, the nature of burning diesel requires diesel engines to be more robust than gasoline, and as a result they last much longer on average than gasoline engines.
I’ll lay some details of the mechanics: the difference between the engines is in how the fuel is ignited. In a gas engine, a spark plug actually lights the gas on fire at a particular point of the compression. In a diesel engine, just the force and heat of the compression of the piston ignites the diesel; a diesel engine doesn’t need/use spark plugs.
In the engine cylinder, diesel fuel burns whereas gasoline explodes. Diesel fuel burns steadily as it expands in the cylinder and turns the drive shaft; gasoline explodes for a short duration as it gives the drive shaft a jerk. As a result, gasoline engines have rapid acceleration, but low torque. With the slow burn, diesel engines pull like a horse, but they won’t leap out of the starting gate.
In order to ignite the diesel via sheer compression, the engine must have a higher compression pressure than a gas engine. Consequently, the engine itself must be stronger and more durable than a gas engine. It is because of this beefier construction, and the fact that the diesel burns steadily rather than explosively, that diesel engines last so long.
Diesel engines have come a long, long way technologically in the past few decades, particularly in one area: cleanliness. Environmentalists could not advocate the diesels of 30 years ago because the exhaust was too dirty. Even though they emit less carbon dioxide than gasoline engines (always have), they used to be so dirty that it offset the carbon dioxide advantage. Modern diesel engines use an array of technology to be more clean, and in the process became even more fuel efficient.
Today’s diesel engines represent an immediate, proven way to reduce america’s wastefulness and impact on the environment. A number of studies, including from the DOE, testify to the environmental benefit of adopting diesels. They win awards, and get lots of attention. Which is one reason why we will be seeing so many diesel offerings from car makers in the next few years . . .
Enough of the proselytizing–I’m sounding like my father. How does this relate to our engine situation?
I regret to admit that our engine is very certainly old technology: 30 years old, to be precise. The old technology is both good and bad for us. It is less efficient than modern engines, and much dirtier. On the other hand, it is as simple as a diesel engine can be, which means that novices like us actually have a snowball’s chance in hell of understanding and working on it. Modern diesels are computer controlled, and have high-tech add on components, none of which I understand.
Our engine emits white smoke, which means that it isn’t burning the fuel efficiently. It needs to be addressed, which may mean a relatively simple tune-up but likely means a whole lot of work and unforeseen expense. With the help of a great diesel friend and regular phone calls to my dad, we will be tackling the engine in the upcoming months. Stay tuned for more diesel details.
It’s amazing how little time must pass before you can look back in hindsight and reflect on the way things used to be. Why, just 10 days ago Syzygy was in great shape, clean and spiffy, and getting spiffier every time we took on a project. Over Thanksgiving, Matt and Jon had fixed the engine coolant leak (the cause of our overheating problems), started rebuilding the Monitor wind vane, installed a fuel gauge on our electrical panel, and finished painting the wooden rub rails (which had begun to rot in places). Before that, I’d re-bedded old chimney flu, and finished installing a stainless steel dinghy cradle.
And just like that, a small repair job turned evolved into damage control and then evolved into crisis management, and now there’s a giant yellow patch on the port side of the deck, and no tracks with which to fly the jib…
Remember when I admitted that opening up 62 holes in the deck was a can of worms if there ever was one? Wasn’t that the truth. It was a friggin’ barrel of worms.
Here’s how the scene unfolded:
As I mentioned, after Liz and I spent a day removing the 43 of the 62 bolts fastening the jib car tracks to the deck, I removed the ceiling panels in the quarter berth, so that I could access the remaining 19 nuts. The nuts were hidden behind a thin panel of styorofoam – and upon removing those, I discovered two distinct piles of corrosion, as if mice had been depositing turds there for a couple of years. This was an omen.
I also discovered that the aluminum backing strip (the same size and shape as the track) was corroded through in 3 spots. Another omen.
Once I removed the bolts, and pulled off the port track, I examined the deck and realized the corrosion on the deck was worse than I had imagined. Another omen.
I did a little test: I gently tapped all over the deck with a hammer, listening to the tone of the thuds. What I heard — a hollow, deep, thud, like that of a drum — did not make me happy. The deck was definitely rotten. This was, officially, Very Bad News.
Lest my next move seem rash, I’ll point out that Jon and Matt agreed that such a move was the right thing to do. It needed to be done. By it, I mean an amputation. A rotten deck amputation.
Deck repair is not the prettiest surgery, nor the tools used for it the most precise. With the grinder and cutoff blade — the same trusty blade we used to dismantle our old metal water tanks — I dug in to the deck, cutting out a 4-by-1 foot rectangle (of only the upper layer of fiberglass). Cutting into the deck brought a strange combination of satisfaction and fear, of pleasure and pain. There is beyond doubt a masochistic element to cutting a giant hole in the deck of your boat. Of course, as Matt, Jon, and I like to joke, cutting holes in our boat is apparently what we do best.
Once the hole was cut though the upper layer of the deck, I peeled it back, and revealed…. a patch of rotten, soaked wood — dark, squishy stuff. More surgery was needed. I enlarged the hole one foot forward and back.. and examined the wood below — still rotten and wet. I grabbed the grinder yet again, and cut away a 10-by-1 foot rectangle — and finally got to dry wood. Phew! (The surgery was as tough on the surgeon as it was on the patient).
Once Liz and I pulled up all of the rotten wood, I examined the bottom layer of fiberglass. In 3 distinct areas (probably the spots that had leaked), the fiberglass was warped into a little cone around every hole — disfiguration that certainly compromised the strength of the deck. The track probably hadn’t been too far from ripping out. So I ground down the little volcano-shapes, and put two layers of thick fiberglass (25 oz. Knytex) over the areas. We also used syringes to squirt thin penetrating epoxy into the exposed wood, just to be safe. I didn’t want a rain shower or a heavy dew to ruin all of my work.
After that, I used a sanding disc on the grinder to bevel the edges of the 10-by-1 foot rectangle, so that I’d have some exposed clean fiberglass to stick the new fiberglass onto. This process involved 1) ear plugs, 2) a full face mask and 3) a huge amount of fine dust, which was a pain to sweep given the light wind.
Next up, Liz and I taped together 12 pages of the New Yorker, and used markers to trace the shape of the hole in the deck onto the paper. We cut out our paper stencil, then used it to trace the shape onto half-inch marine-grade plywood (leftover from the water tank project.) Fifteen minutes with the jigsaw took care of the cutting — and the wood fit perfectly. The stencil had been an improvisational stroke of genius.
The next morning, all amped up to fix the damn hole in the deck, I realized I didn’t have enough epoxy to do the job. I got a ride over to Svendsen’s with the Big Wise Mainer (see earlier posts) and spent $150. I should have seen that coming. When i got back, I mixed up a bucket of epoxy, and stirred in enough thickener to make it the consistency of peanut butter. I spread this peanut-butter epoxy all over the bottom layer of fiberglass, and stuck the wood to it. I mixed up more epoxy and filled in the gap around the edge of the wood, so that the wood wouldn’t budge, and so that there wasn’t any air space left in the middle of the deck.
And then I realized, yet again, that I didn’t have enough epoxy to do the rest of the job. I couldn’t believe it. I remembered when I’d bought my first can of epoxy, a year before, in Mexico — a measly 1 liter can, which seemed like it cost a fortune. Since then, we’d smartened up and started buying the one-gallon cans — a better value. Now, it seemed, we should have gone with the five-gallon buckets. Oh, the money we’ve spent on epoxy….
Liz stopped by again (eager to finish the job) the next day, and after putting on two layers of fiberglass, and painting it with the last little bit of epoxy I had left, we rode over to TAP plastics to resupply. Two hours, ten miles, and $200 later we returned, our heavy bags digging into our shoulders. By now it was dark, as yet again a boat project dragged on… and on… and on. We used the paper stencil to trace the shape of the hole onto the fiberglass, and cut out three pieces, (each slightly larger than the last) which fit perfectly. We put on one layer and made some food. We put on another layer and opened a bottle of wine. Finally, around 1 AM we put on the last (5th) layer of fiberglass, and finished the wine. I took a deep breath. The deck was a deck again.
I’m confident that the patch is bomber, but then again, it damn well better be, considering I spent a week on it. Of course, all I did was fix the giant-hole-in-the-deck problem. I have yet to a) get new tracks ($100 each from Garhauer) and backing strips (who knows?) and bolts and b) install them.
At least the deck isn’t rotting — or leaking — anymore. Gasp.
It’s a trick question, of course, requiring a bit of a story…
For the last couple of months I’ve been on a mechanical crusade to make sure everything screwed through the deck of our boat is screwed through the deck properly. By properly, I mean in a very particular way, which I’ll get to. But first: the deck is sandwich-like, in that it’s made of two pieces of fiberglass with a layer of balsa wood in between. It’s like a sandwhich made of matzoh and cream cheese. This design has its ups and downs. One down is that if you apply a lot of force, it’s not too hard to squish the sandwich, which weakens it. Another down is that if you drill through the sandwich and don’t seal the hole just right, water that leaks in ends up rotting the balsa wood (further reducing its strength) before it leaks all the way into the boat. It’s strange, but if you have a leak, you want it to actually leak.
So the proper way to drill a hole through our deck is to drill a much bigger hole than you need, and then to scoop out a bunch of the balsa wood around the hole. Then you put a piece of tape on the bottom of the hole, and pour in a big glob of thickened epoxy, which is about as thick as peanut butter and about as strong as, well, modern plastics. Then, once the epoxy hardens, you drill a hole through the middle of it. This accomplishes two things: it provides some support (like the little plastic thingy that keeps the pizza box from collapsing all over the top of the pizza), and it protects the soft, wooden core of the deck from rotting if it ends up leaking. As you probably guessed, there are lots of things screwed through the deck: a dozen stanchions (aka fence-posts around the edge); a 6″ disc covering a 5″ hole for a chimney flu; hardware for flying the spinnaker; the liferaft cradle; the dingy cradle; the fairleads (pulleys) that keep our lines in order; our new rope clutches; 9 chainplates that keep the rigging tight; and two 10-foot tracks that the jib cars slide along. Most of the items on the list are held in place by a few screws, presenting minor challenges — and so far we’ve fixed everything but the stanchions and… the jib car tracks.
I’ve been dreading the task of re-bedding the jib car tracks because they’re a little more committing. Each track is 10 feet long, and is held in place by 31 screws — one every 4 inches. Why so many? Because the jib car (aka pulley) that slides along the track has to be able to withstand the huge forces — thousands of pounds in normal sailing conditions – generated by the jib. To keep the track from ripping out of the deck, those 31 screws are bolted to a similarly shaped 10-foot backing plate beneath the deck. I was dreading the project for two other reasons. First: because it was an all-or-nothing job. To fix the leaks, I’d have to get the whole track off (without breaking or damaging it), and to get the whole track off, I’d have to get all 31 screws out. There could be no stopping half way. It would require commitment. Secondly, it was a bold move — I’d be opening up 62 holes in the deck — a can of worms if there ever was one — and hoping that it wouldn’t rain in the middle of my efforts. I’ll be the first to admit the project made me nervous.
Here’s the fun part: remember the leak Matt found in the engine room (over the batteries and his new wiring), and that other leak I found in the quarter berth? It turns out those leaks are coming from the jib car tracks — through more than a few of the 62 holes that were drilled straight through that matzoh sandwich. You can tell just by looking at the deck, which is obviously warped where the screws go through it. There are at least a dozen divots in starboard deck, and at least two dozen in the port deck, and, early in the morning, when there’s dew all over the boat, you can tell something’s wrong by the little puddles that form in them.
After many cups of coffee, my friend Liz agreed to come over to the East Bay and help me work on the boat. I was optimistic, since working with someone else is so much more fun than working alone. I grabbed the 1/2″ socket, and removed seven nuts on the bottom of the port track. Then I grabbed the largest slotted screwdriver on the boat, and the largest wrench, and kneeled down at the front of the port track. As I pushed the screwdriver down on the first screw, Liz used the wrench to get as much rotational toque as she could. It didn’t budge. I ran back in, and grabbed the chisel, which was slightly larger than the screwdriver. Still no luck. Actually, it chipped the chisel. Hmm. It was time to get a bigger screwdriver.
Liz and I hopped on our bikes and rode over to Home Depot, which is about 2 miles away. On the way, I told her about the 5 steps of screw removal, which, depending on the severity of corrosion, range from quick-and-easy to laborious-and-achingly-slow.
step 1: try a screwdriver, using wrench for extra torque
step 2: apply PB Blaster or Liquid Wrench or some other chemical to dissolve corrosion, then repeat step 1
step 3: apply heat using a handheld propane torch (a la creme brulee), then repeat step 1.
step 4: drill a small hole and use an extractor bit to remove the screw
step 5: with a cobalt bit, drill out the screw until head pops off.
I told Liz that I desperately hoped we would not need to run through all of these steps, as I had in the process of rebuilding the furler. (Four of the tiny stainless steel set screws holding the aluminum extrusions wouldn’t budge, so after drilling them out I ended up tapping new threads and installing slightly larger set screws. It took way too long.)
At Home Depot, we headed for the eft side of the tool corral, where we bumped into an employee in one of those orange aprons. This conversation transpired:
me: (Holding up a 3/8″ slotted screwdriver) Is this the largest screwdriver you have? (I really wanted a 7/16″)
HD: Yeah. Nobody makes screws bigger than that.
me: I beg to differ. Got any other bright ideas for getting screws out?
HD: Well, you could try an extractor…
me: (Recoiling at the thought.) I could, except that I have 62 screws to remove.
HD: Ah, yes, i see your point.
me: Well, thanks for your help.
So I bought the 3/8″ screwdriver, and prayed a little bit. I sorta felt like I was returning empty handed.
Back at boat, we sprayed Liquid Wrench on all of the screws, and tried loosening one. No luck. We tried another. No luck. We were very dismayed. Such a simple task! Remove a screw! And yet we were failing. For some reason, we tried one more — and it worked. It was teamwork, and it was glorious.
Liz sprayed Liquid Wrench on the bolts again, and we spent the next five hours removing the screws — reveling at each one. I crawled into the tool locker, the wet locker, the engine room, and and cockpit locker to remove the nuts on the back. At one point, I lay down on a cutting board on the stove, and reached into the galley cabinet with a headlamp in one hand and a socket wrench in the other. When that didn’t work, I used a pair of vice grips.
In a couple of hours, I removed all 31 nuts from the starboard side, and 12 from the port side. I couldn’t find the motivation to remove the ceiling panels in the quarter berth, which I’d need to do to get at the final 19 bolts.
One-at-a-time, while I pushed down on screwdriver and Liz torqued it with the wrench we removed the bolts on the starboard side. At one point, Liz leaned over and got a little puddle of Liquid Wrench — which pretty much smells like a gas station — in her hair. As we neared the last few, beers were raised, cheers were exclaimed, and music was turned up. It was late at night by the time we finished, and it was one of the sweetest victories I’ve known yet in all of the work on the boat. Afterwards, many cups of tea and cookies were consumed before we called it a night.
The next morning, after removing the ceiling panels in the quarter berth, and removing the 19 nuts, I attacked the 19 remaining screws in the port track. I got all but 4, and felt like a genius. But the last four wouldn’t budge, so I went and sought help.
I went straight for the big Mainer on the steel boat — the guy who’d dispensed so much wisdom before. I found him about to leave for lunch, and begged 2 minutes of his time. Together, we loosened two of bolts — leaving only two. I was so close!
Then the Maine Guy offered more wisdom.
“You need an impact driver,” he said. “You know what that is, right?”
“Of course,” I said. “Um, no, maybe not. What is it?”
He told me it was shaped sorta like a screwdriver, and that you hit it with a hammer to loosen screws that are stuck. He told me to go get one at an auto supply store — and that for about $10, I would not regret my purchase. I knew I could count on him.
Before heading out, I texted Matt: “two screws left but they won’t budge.”
Matt texted me back: “hammer from below?”
I responded: “already tried that.” But I tried again, just for fun. No luck.
I hopped on my bike and rode to Berkeley, in search of 62 new bolts (5/16″, philips, 2 1/4″, stainless) and nylock nuts, and an impact driver. My first stop was an auto parts store didn’t have one. My second stop was Bowlin, the screw distributor that ranks among my favorite stores ever. They didn’t have the screws I wanted in stock, but ordered them for Monday. After that, I swung by a big hardware store (OSH), and they didn’t have an impact driver either (though one of the employees said a lot of people had come in asking for one lately.) From there, I rode two blocks, to a tool supply company (Grainger) that also didn’t have an impact driver — not even in their phonebook-thick catalog. An employee there recommended another hardware store (Truitt and White, back near where I’d started), and called them, and they didn’t have an impact driver either. I told him about my quest, and how nobody — not Home Depot, not the auto parts store, not Grainger, not OSH, not Truitt and White — had an impact driver. He recommended a place 25 miles south, in San Mateo, called (and I’m not making this up) K119. “That place has all sorts of stuff nobody else has,” the guy swore, as he wrote the K119 on a yellow sticky note. Alas, I wasn’t eager to go 25 miles for a $10 tool. Not quite willing to give up, I rode across the street to Ashby lumber/hardware, where, yet again, I didn’t find an impact driver. Only 2 bolts left and totally stymied! Somehow, though, one of the guys behind the counter heard me say the words “I’m looking for an impact driver,” and told me, matter-of-factly, “they have ’em up at Pastime, in El Cerrito.” My thought then was: Where, where? (By now, as I’ve said before, I thought I was familiar with every hardware store within 20 miles.) So the guy called Pastime, and handed the phone to me, and lo and behold, I confirmed that the tool existed there. I was so close!
Pastime, apparently, is the oldest hardware store around. It’s 75 years old, and on the site of the old blacksmith shop started by Wilhelm Rust, a German immigrant who landed in a small town north of Berkeley that became the home to many fleeing San Francisco after the 1906 earthquake. The blacksmith shop grew into a hardware store, and by 1917 the little town was named after Wilhem, and incorporated as Rust, California. (It was later changed, perhaps more appealingly, to El Cerrito, in reference to the steep little hill in the middle of town.) At any rate, I’m a big fan of old hardware stores, with real tools and parts instead of kitchen items and birdfeeders and other gimcrackery, so I headed up there even though I was tired of this hunt-for-an-impact-driver game.
Pastime had aisles and aisles of stuff, much of it in glass cases, museum-like. I wasn’t really sure what an impact driver looked like, or where it’d be, so I asked for help. The cashier suggested aisle 6. There was no such thing there. A customer service guy tried aisle 5. There was no such thing there either. By now I was getting kind of annoyed, because the guy on phone had assured me it was there — had, in fact, been in his hands — and that it cost $12.99. So I walked into the office, and asked the assn’t manager. He knew exactly where. Lo and behold, across from aisle 4, on the bottom shelf, sat an impact driver, in a black plastic case, about the size of a walkie-talkie. It cost me $12.99. Brilliant.
By now the afternoon had worn on, and the sun was just above the horizon. I pushed the pedals a little harder, and got back to Syzygy just a the sun had gone down, while the sky was still glowing. I opened up that impact driver like it was the best present ever given on any Christmas, and went to work on those last two bolts. It worked, sorta. I loosened them enough that I was able to go back to step 1 — screwdriver + wrench, with the help of Gregory, another neighbor at the marina — and voila, I had the track removed. I took a deep breath, did a little dance, and grabbed a beer. I felt I’d earned it.
So, how many people does it take to unscrew 62 bolts? Four, provided they have access to 6 hardware stores, 2 new tools, and 1 amazing chemical.
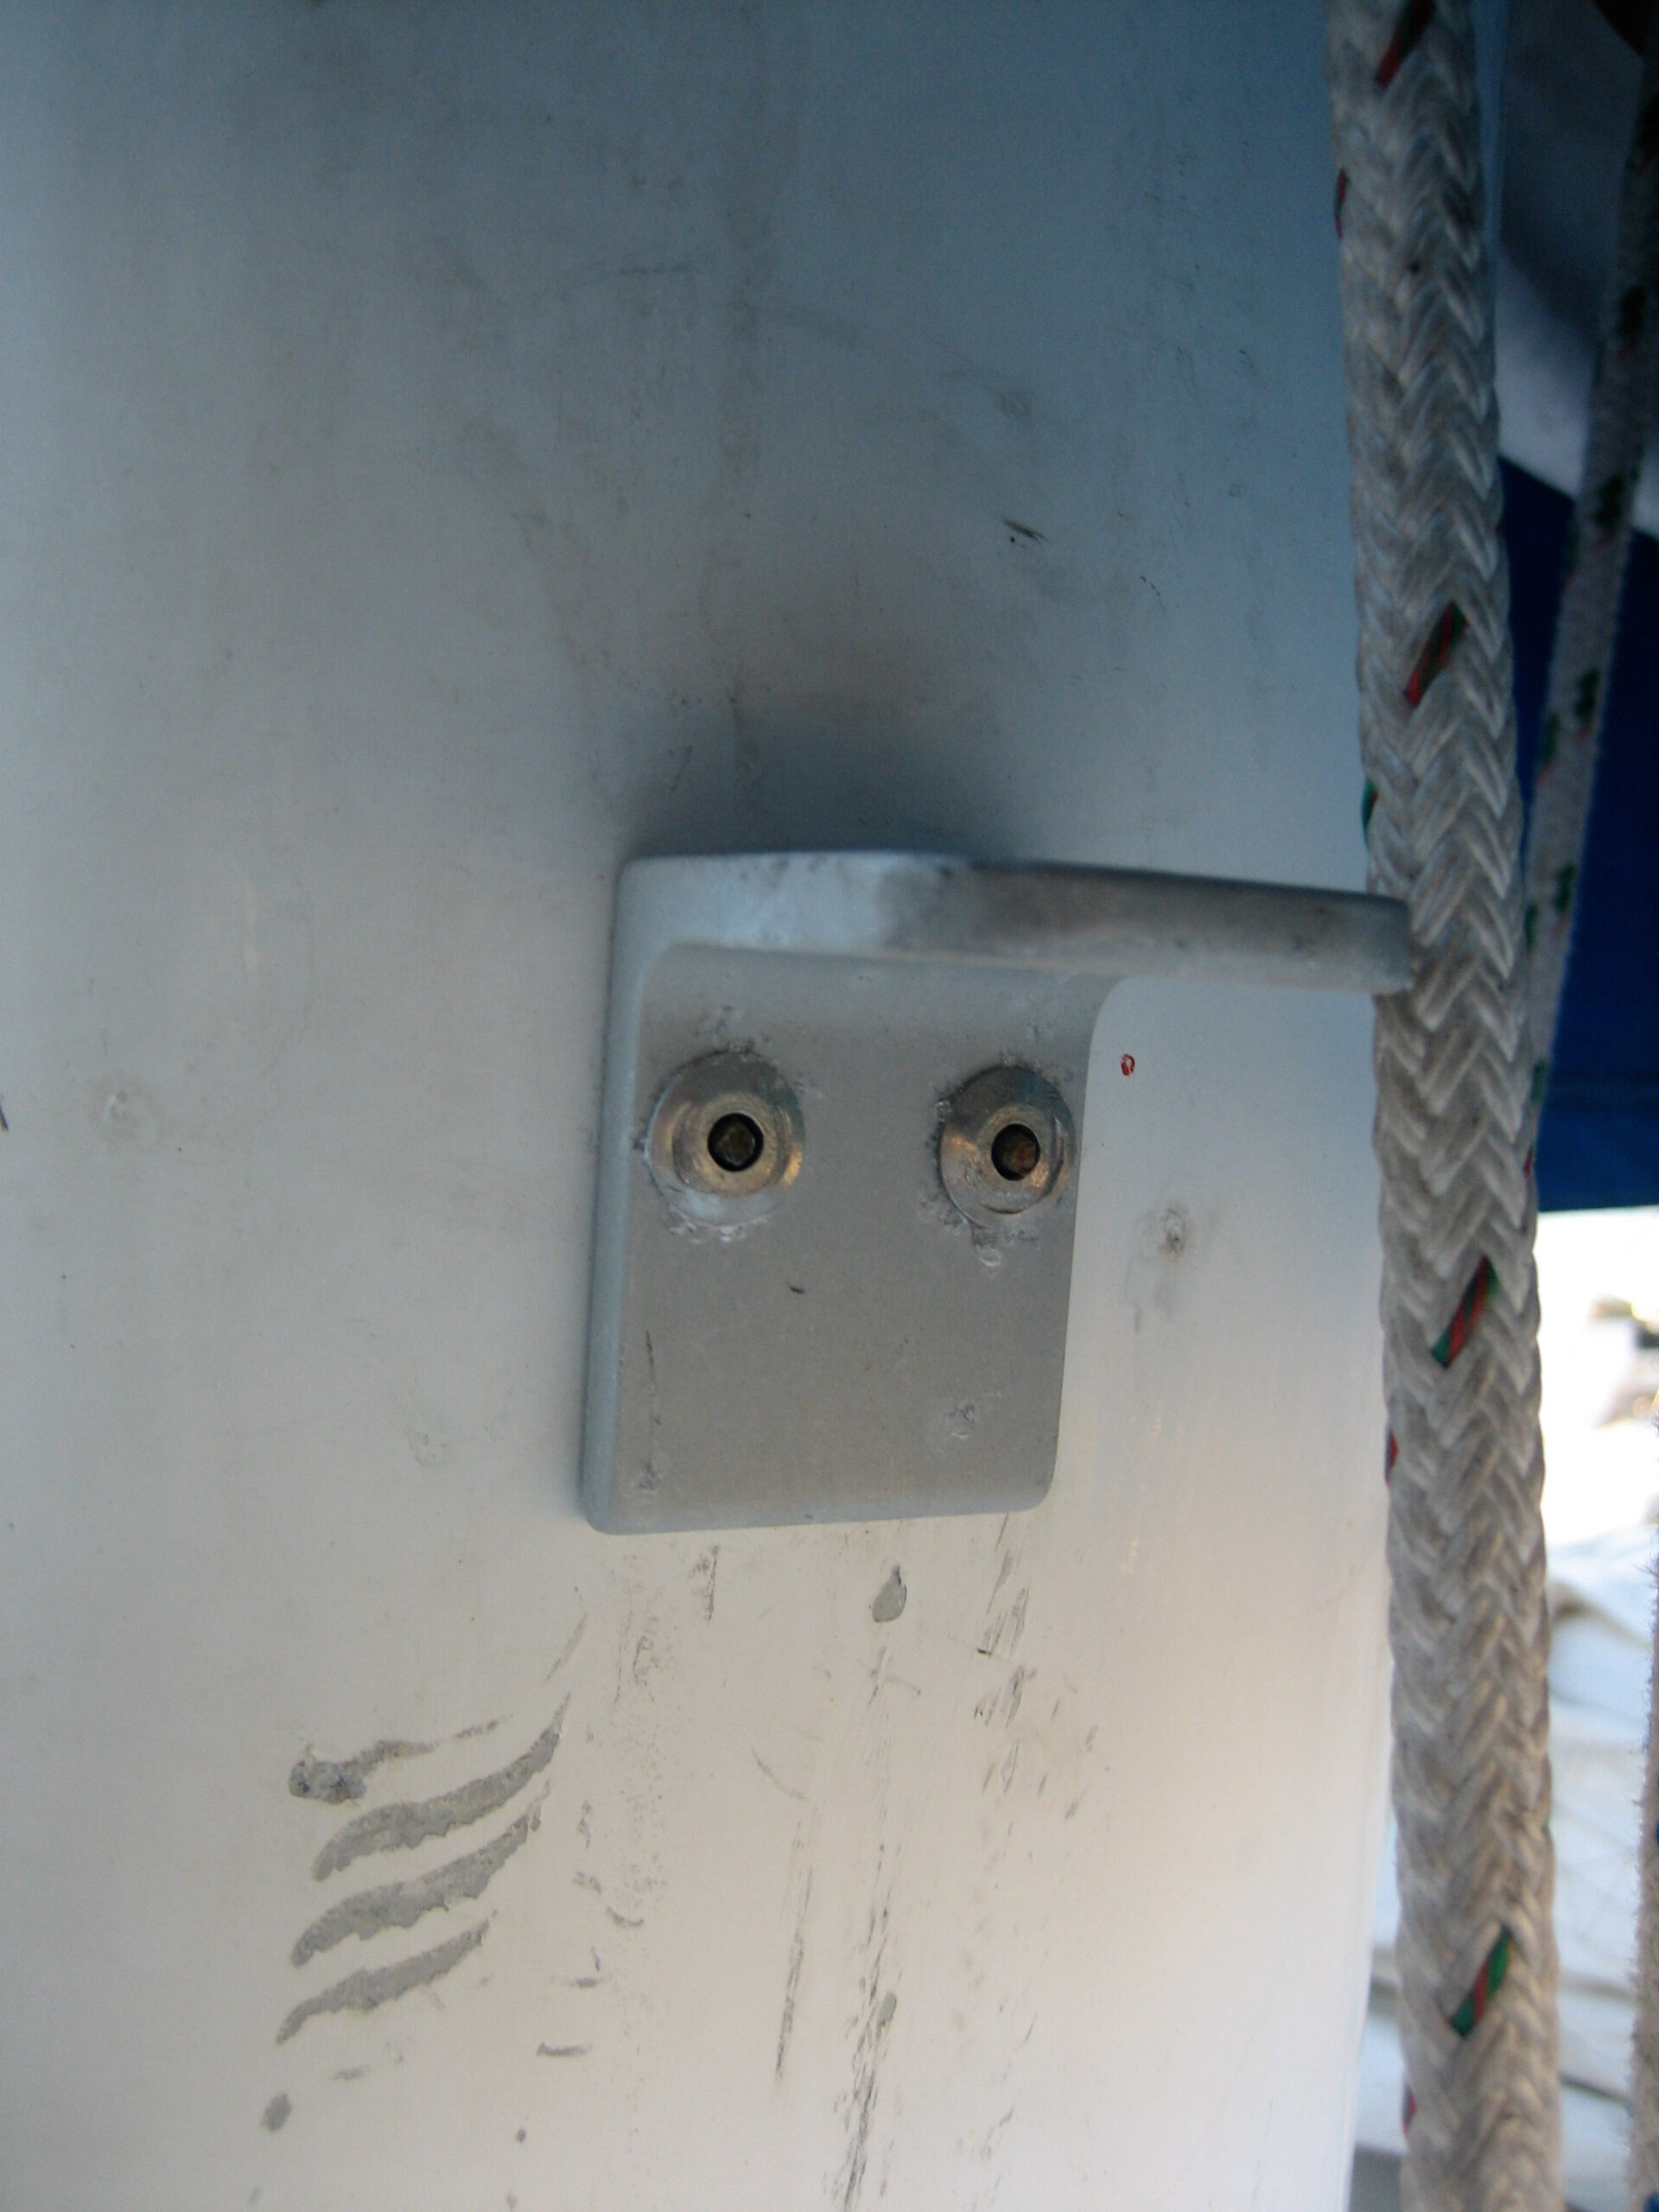
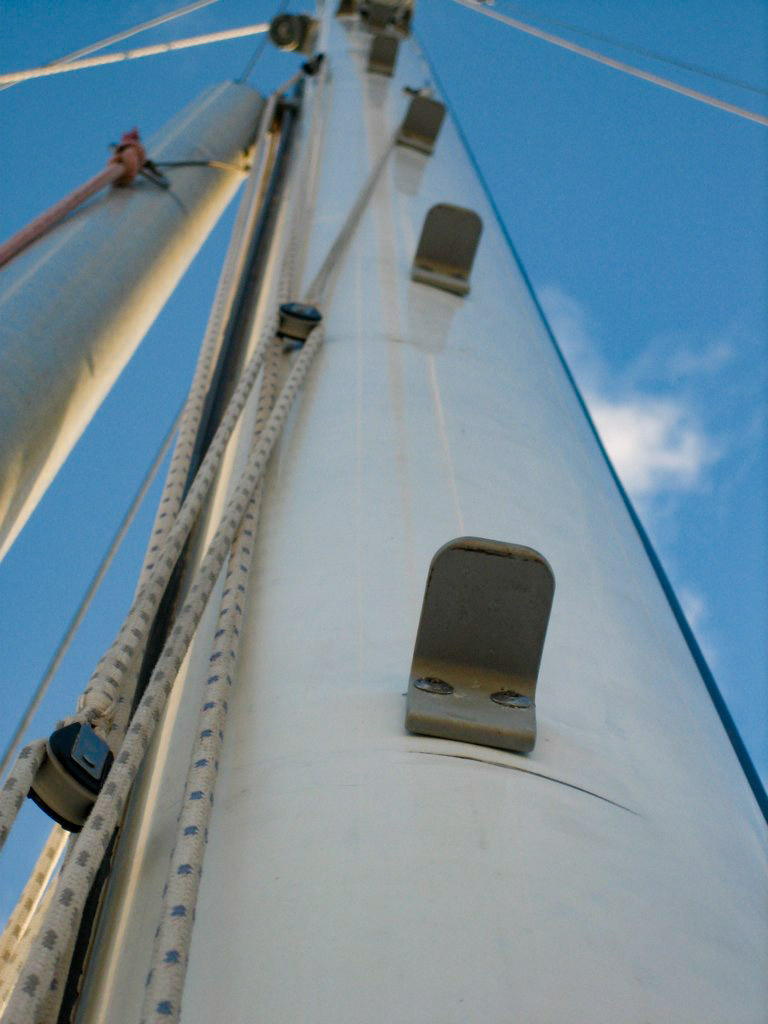
A while back I designed a mast step for us, we had a sailor/machinist friend advise us and then make them up for us, and Jonny installed them. We love them, and it turns out that others do, too. We had enough requests that we decided to start making and selling them on a small scale, and see if it goes anywhere.
They are sweet steps, as far as mast steps go. They’re small, so lines don’t catch on them, they’re easy to install, and they’re cheap. The only reason we made our own is because we weren’t happy with any of the other options available–the others are either to big (the fixed stirrup-style), too unwieldy (the folding ones), or too expensive (all of them).
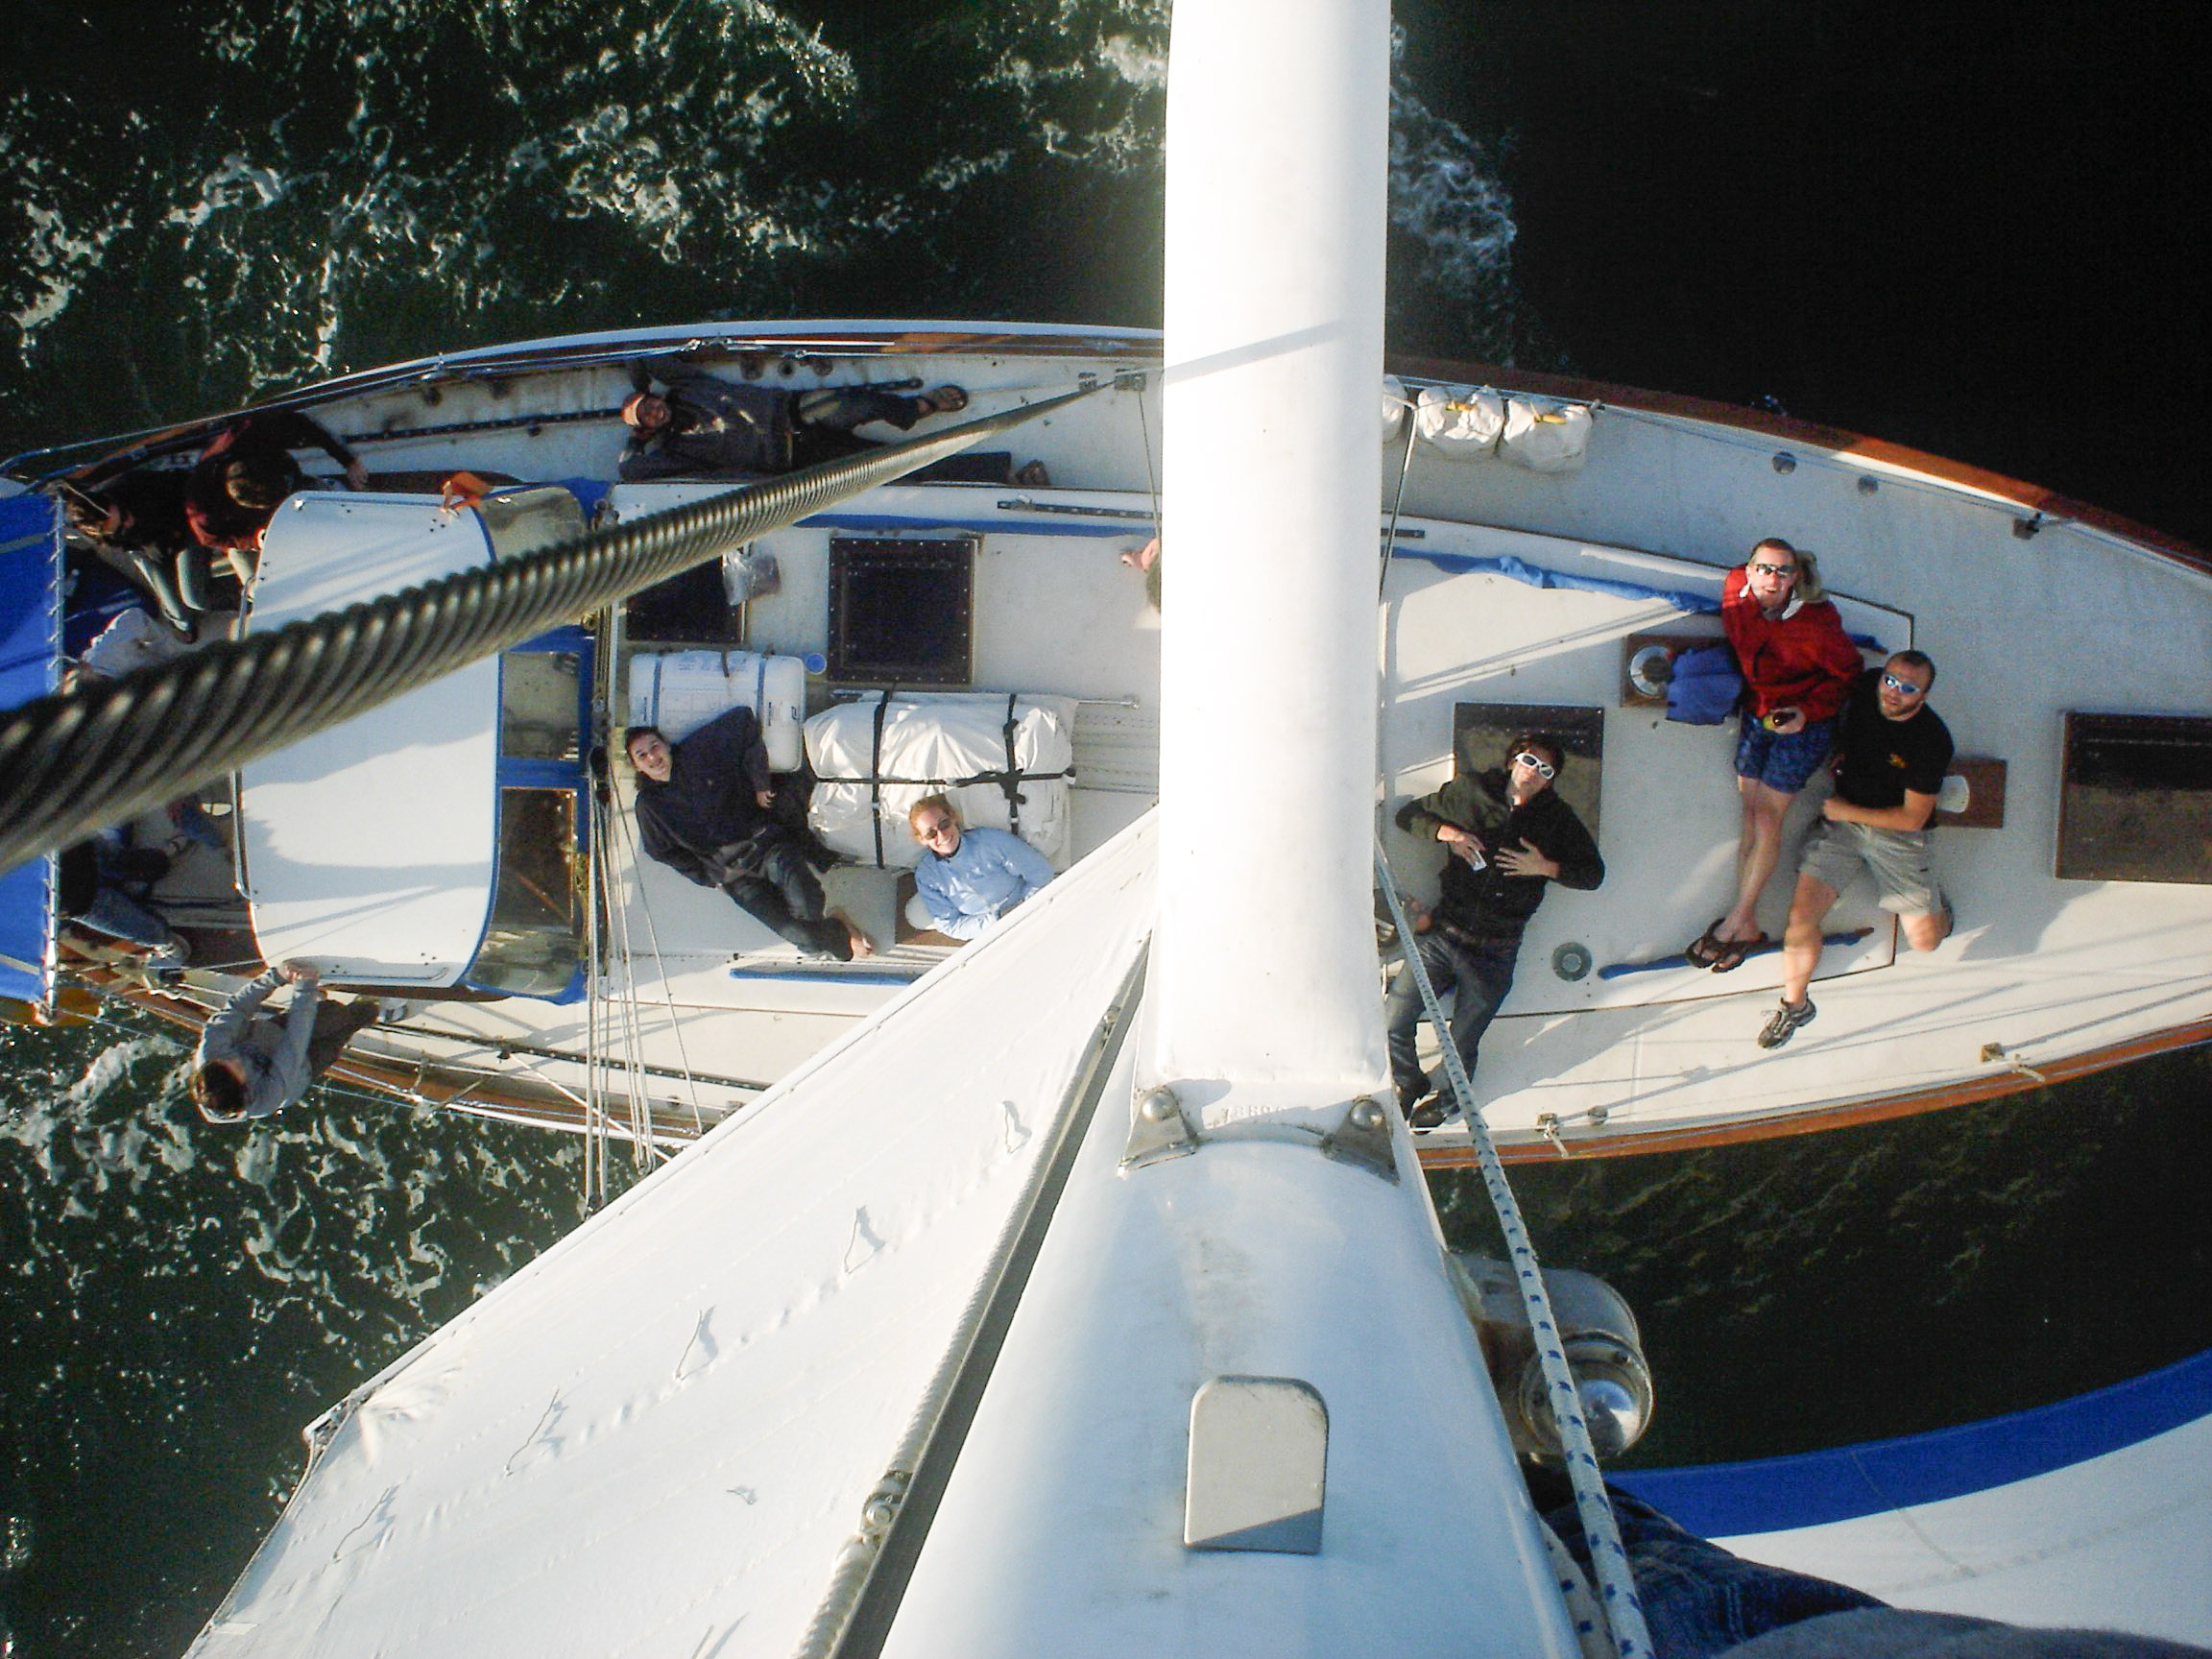
They work so well that we’ve been running up the mast regularly while we are out in the bay under full sail. It makes for good group pictures during our social sails, to do them from the top of the mast looking down with the sails flying and our wake spreading out behind us.
It started raining yesterday; it was the first rain we’ve had in eight months.
Then the boat started leaking. I had thought that we had already tested her thoroughly, by putting enough water over her bow in the course of our sailing to leave no dry spot. Knowing how boat things go, though, I should have known that we wouldn’t get off that easy.
It leaks around at least three of our hatches. There’s a leak around the companionway that drains into our engine room–directly over my brand new electrical installations. I stopped looking after that. There must be dozens of leaks: behind cabinets, under boards, inside lockers, etc. I can’t think about it right now, it’s too discouraging.
I spent the last two days drilling 36 holes in our mast, and I plan on drilling another 20. Not big holes; just quarter-inch holes. I’m installing mast steps, so that, from now on, getting up our mast won’t be a lengthy/cumbersome affair. You never know what you may need to fix up there.
Matt and I had meant to install the mast steps when the mast was out of the boat and lying flat on the ground, but we got sidetracked. Actually, the mast steps were a side track, and the main track was: fix things that need to be fixed before putting Syzygy in the water.
So now installing these 2-inch aluminum “steps” — which John Ryan custom made for us at his machine shop — requires ascending the mast 21 inches at a time. Twenty one inches seems a good height for a step — it’s about knee height for Matt, Jon, and I — and though we could certainly step higher in present conditions, it seems prudent to make the steps climbable in the rain, in the dark, while the boat is swaying madly.
Today, I noticed that the higher I get, the better the view. Already I can see every boat in the marina, and the bay beyond the marina (covered in whitecaps), and Mt. Tam and fog rolling in through the Golden Gate. I also noticed that the higher I get, the more I can feel the sway of the boat, too – which makes drilling even more of a challenge — more on that shortly. And the higher I get, the longer it takes to scamper back down, to get the tools I need.
Hence this afternoon’s approach: harness plus haul bag, climber-style. The haul bag was key, since I need to carry so many small parts — rivets, washers, steps, punch, guide, hammer, and tape measure. I’ve been carrying the drill over one shoulder (I tied a loop of line around it) and the riveter (which is about 2-feet long, and looks like a giant pair of scissors) over the other.
Until I got to the spreaders, about half-way up the mast, I was just using a five-foot loop of rope around my waist and the mast as a quasi-anchor, as tree-climbers do. The more I leaned back, the more secure I was — assuming my rivet work was solid. Just above the spreaders, I’ll admit I was relieved to clip into the baby stay block. From there on up, though, It’s a straight shot, so it’ll back to tree-climber style, with a prussik on a spinnaker halyard as a backup.
About halfway up the mast (five feet beneath the spreaders), I ran into a bit of trouble while drilling today. Now, drilling through a quarter-inch of aluminum while dangling there at a funny angle isn’t the fastest operation, and I regularly had to shake out my hands to get the blood flowing again after pushing on the drill for so long. But one hole seemed to be taking longer than the others. Lo and behold, there appeared to be another piece of metal inside our mast. (I’d been careful to avoid the conduit that carries the wiring up the mast.)
Perplexed (i.e. unwilling to drill into the unknown), I scampered down, and called Fred, at Valiant Yachts (in Texas). He said that it’s common for factories to order masts made of two sections, with a 4-foot sleeve welded in the middle. Why two sections? Because mills can only produce aluminum extrusions so long, and shipping shorter segments is cheaper. So, on second look up there, I found the little spot where the two sections are welded together — it’s barely detectable. At first I was freaked out, but further research (aka Brion Toss) has revealed that this is not a weak part of the mast, apparently — at least not if it was welded properly. So I grabbed the drill and continued, and confirmed that a) I hadn’t drilled into something I hadn’t intended to, and b) the mast is indeed twice as thick there. Who’d have thunk it? Of course, now I need four longer rivets for two of the steps.
I’d been sorta hellbent on making it to the top of the mast this evening, but in the end, the drill got the best of me: the battery died, and I’d forgotten to toss an extra in my haul bag. So it’s back to it tomorrow — here’s a snippet from when I had a free hand.
“Shut it off!!! Shut it off!!” I screeched, sounding much like an excited 16 year old girl. I was half excited and half terror-stricken, because something dramatic had just gone wrong with the engine. This was 6 months ago, when I was hellbent on becoming Syzygy’s primo engine mechanic.
The engine is a mystery to me. I love working on it, learning about it, figuring things out, but in the end, most things that would be good to know about an engine, like how tightly to crank down on a bleed screw, are a mystery to me.
We had just changed the fuel filters. Doing this introduces air into the fuel lines which is bad for the engine. The next step is to get the air out of the fuel lines; bleeding the fuel lines. You do this by working a hand pump that is inline. Then you open up three screws, one at a time, each further along the fuel line and closer to the engine. Keep moving the pump, and air is supposed to leak out from each screw. When air stops leaking out, tighten the screw down. No problem.
The next time you turn on the engine, you’re supposed to look at those screws that you loosened to make sure you tightened them down enough and fuel is not leaking out. ’cause that would be bad.
And sure enough, this time, there was fuel leaking out. Slowly, but there it was. So I got out the socket wrench and tried to tighten it. Hmmm, it’s still dripping. Tighter… tighter….
oh shit! my wrist lurched forward and my body with it. Liquid arcs out of the engine like water coming out of a garden hose. Except water is innocuous, and to my racing heart, brain, nervous system, lungs, and vocal cords, this liquid represented certain chaos and destruction.
“Shut it off!!! Shut it off!!” I screeched. I wonder what went through Matt’s mind at that moment, hearing the hysteria in my voice, and racing to the shut-off valve. Might he have been worried about my well-being, thinking, “is he hurt?” Maybe, “What just happened to the engine?” My money is on, “What the fuck did he break now?” The level of my fixer-upper skills having been well-established at this point.
As the engine died, and fuel slowly stopped pouring out of the bleed valve I had just broken off, I realized the situation had not quite called for such a sounding from me of imminent danger. In my terror, I had thought of what I had learned about oil, and if the engine runs without it for even a few moments, very bad things can happen. Without fuel, however, the engine would have just stopped on it’s own. I also could have easily stopped the fuel myself, another shut-off valve located in the engine room being easily reachable. Also, the screw I broke off was on the low-pressure side of the fuel lines, not the high-pressure side. This is somewhat important, because highly pressured diesel can penetrate your skin and cause bad things to happen. Like the sun when it penetrates your skin and eventually causes bad things to happen. Kind of.
Sailing was out for the day, as we had no replacements. So we kicked back with a few beers in the cockpit for a couple of hours with the guests that had come over hoping to sail. After a couple of beers, they felt safe enough to remark that, umm, my tirade had caused a bit of a scare. For all they knew, the boat was about to blow up. We all laughed at my expense, a frequent enough occurrence throughout the summer that I wasn’t too hurt by it, and was able to laugh along as well. it became the running joke of the night to observe some behavior of mine and then add, “Jon, you’re scaring the guests,”
So the first three times we sailed Jon, Jonny, and I went out by ourselves. This turned out to be a smart idea, because three times in a row we went out and broke something.
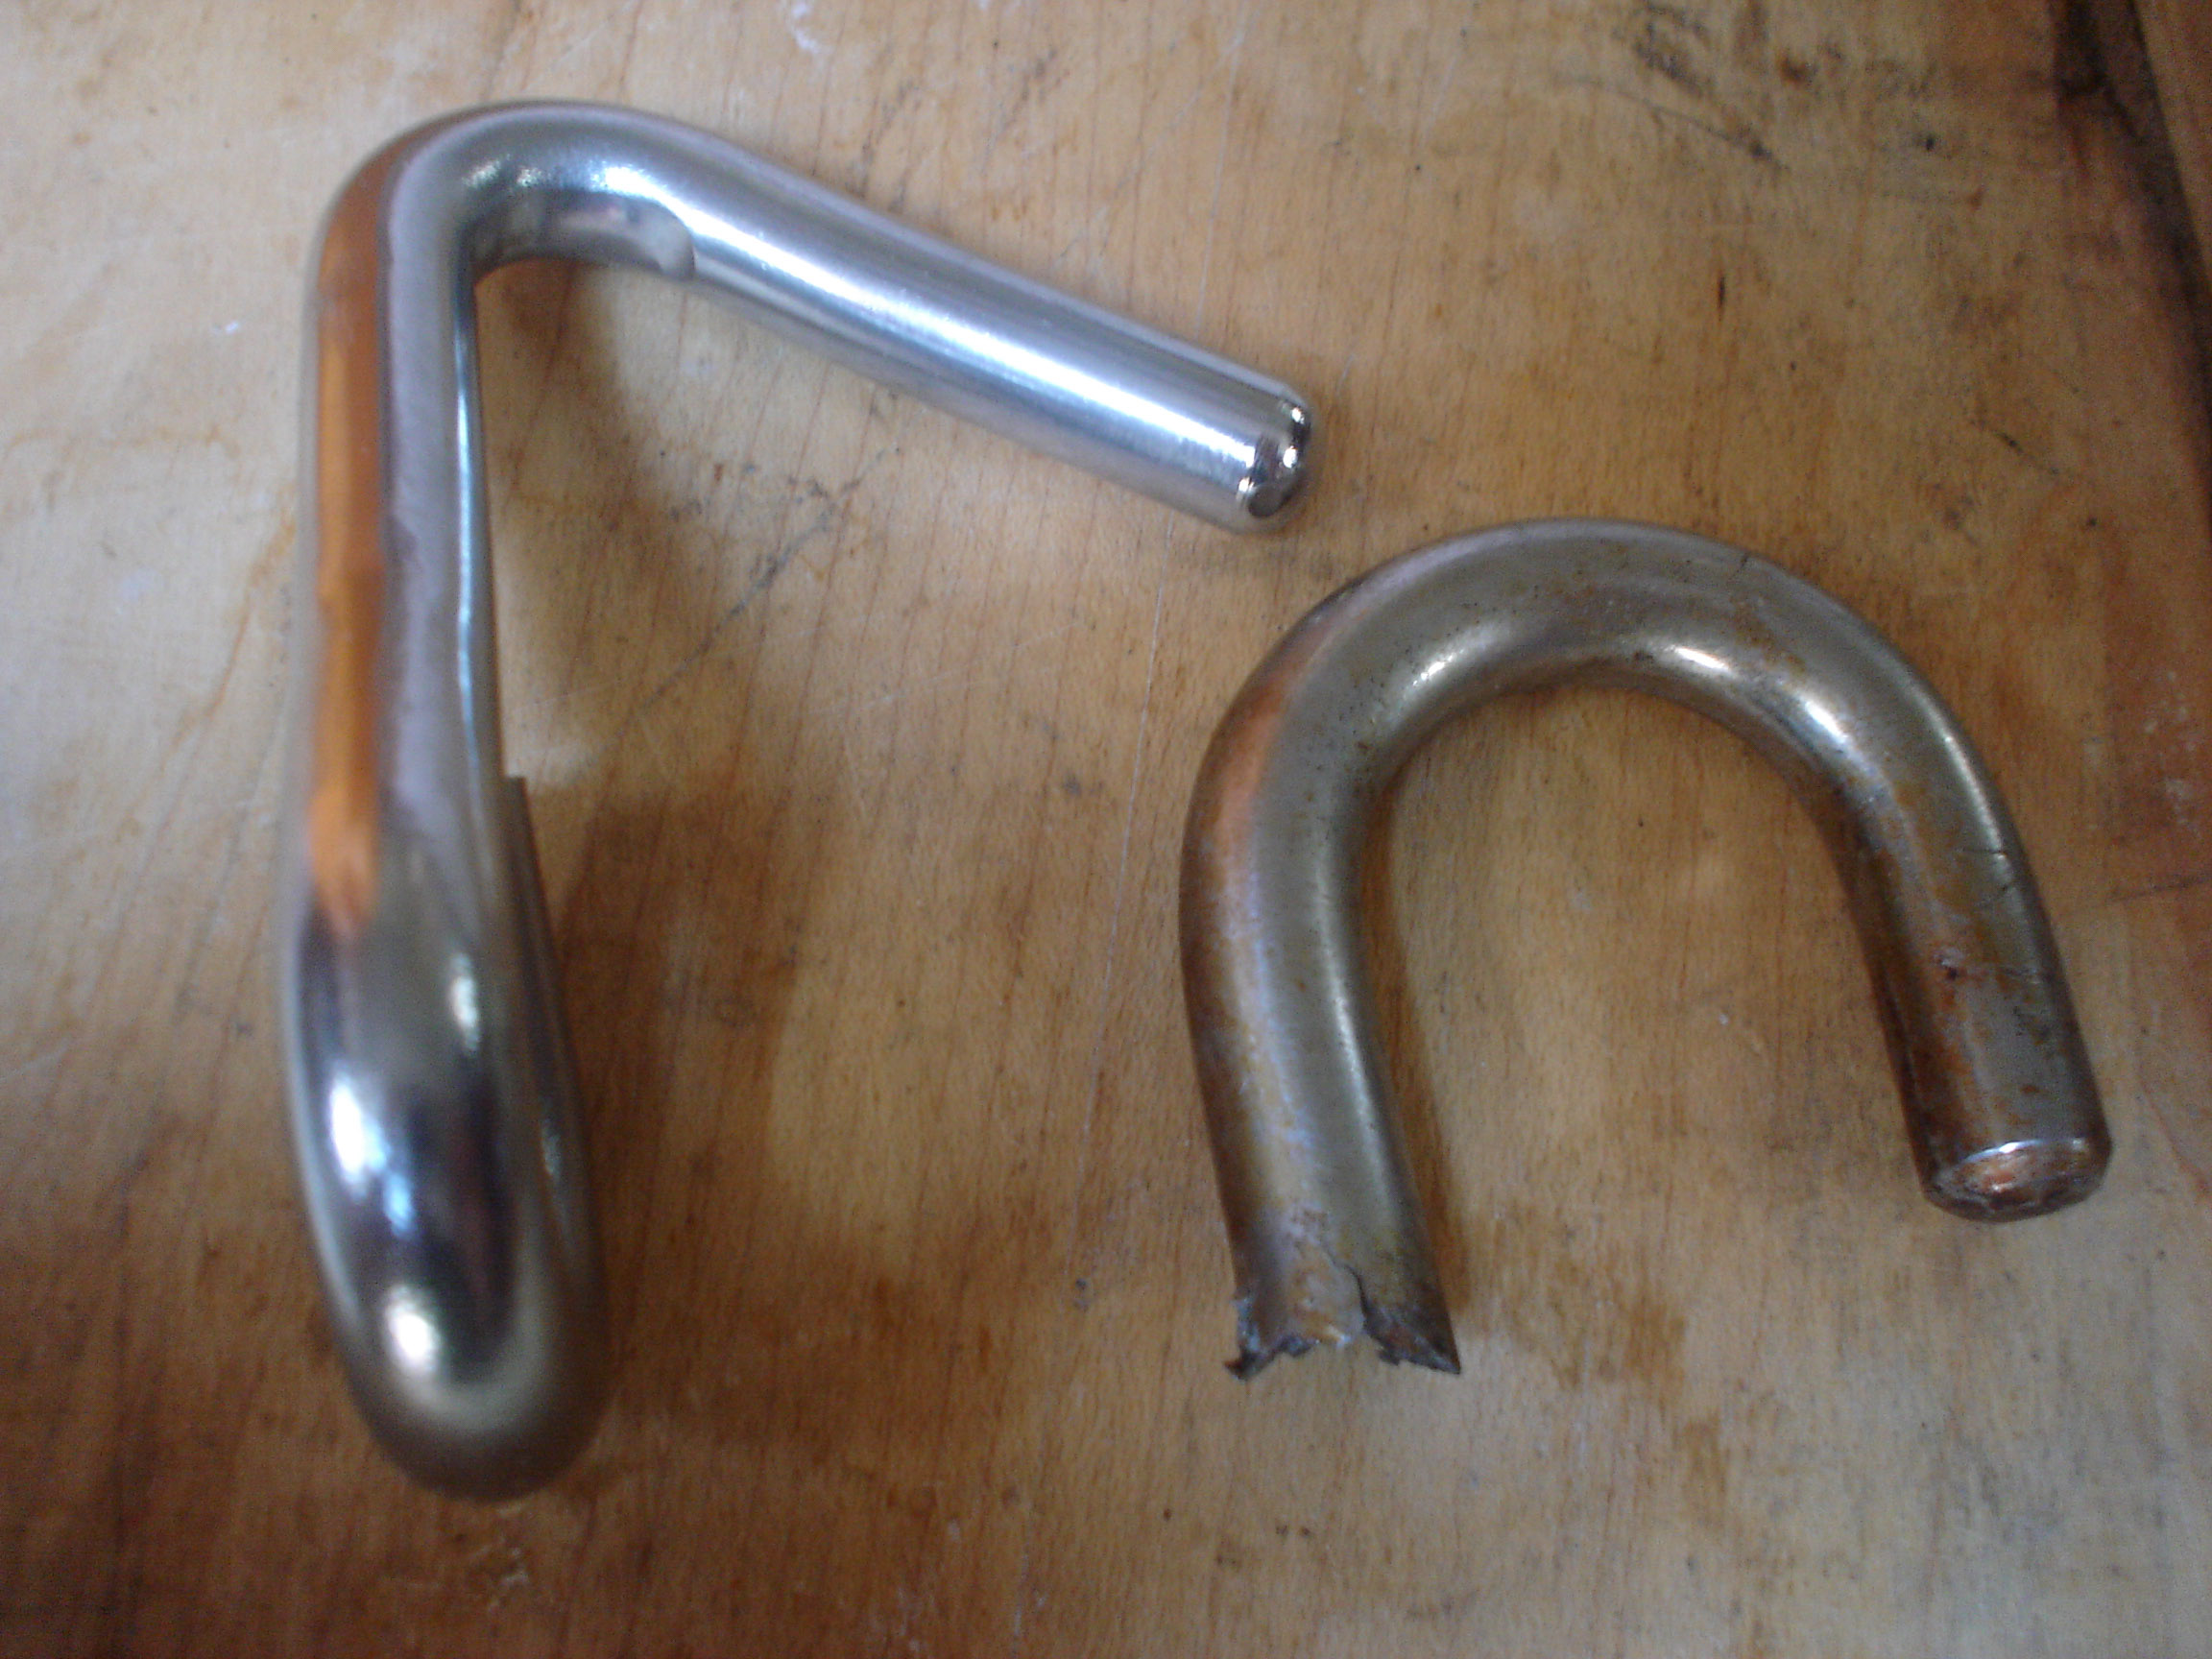
On July 4th we broke our reefing hook–broke it right in half (the metal was corroded apparently). We were practicing reefing, we lowered the mainsail, Jon hooked the tack to the reefing hook, and when we started tightening the halyard back up half the hook just flew right off. Lesson learned: don’t trust even large, seemingly strong metal parts without good reason. So we replaced the reefing hooks; we even put one on each side so it’s easy to reef from either tack.
The next time out we blew up a rope clutch. I was unwinding the main halyard from the winch and as soon as the force was transferred to the rope clutch it just shattered, the top popped right off and the axle snapped out. Pretty dramatically. So we replaced all of our rope clutches, and our deck fairleads, and serviced the winches.
The third time the stitching on the luff of our jib came apart. This was to be expected I suppose, since the stitching that failed was the stuff that’s been sitting in the sun for a decade while the sail was wrapped around the furler. It cost $175 to have Pineapple Sails restitch it.
Usually I think of myself as a somewhat intelligent individual. I did really well studying Chemical Engineering. I scored in the top 5% nationally on the GRE. I scored higher on a reading comprehension test than all the English teachers at my school. My parents tell me I’m smart. On the boat, however, I am constantly humbled at how many questions I have, how uninformed I am, and how many ridiculous things I’ve done recently. I love laughing at myself, and the boat has given me (and Matt and Jonny as well) plenty of occasion to do so. Some of those moments:
One of the first pieces of work I tried to do on the boat, back in January: “I know you said cut the through-hull flat, but is this 45 degree angled cut ok?”
From my first day of work here in Emeryville, “I couldn’t find any wooden chisels.”
When I said to Matt: “Is it bad that there is smoke coming from the Dremel?”
When I forgot to turn over a piece of wood I was epoxying, thus painting 7 coats of epoxy on one side of a piece of wood, instead of 2 coats on one side and 5 on the other side.
“It’s not my fault I dropped the Pelican hook in the water.”
To Jonny, “I don’t understand why the screws won’t go in.” He politely and amusedly noted there were already screws in there.
Overfilling our water tanks to the extent that a veritable waterfall poured out of the vent hose directly on our new stereo. (see more about this from Matt’s perspective in previous posts)
When I bought Matt a bright pink electric panel cover instead of the blue he asked for and said, “I don’t understand, you don’t like the color?” (ok that was a practical joke; I bought him blue also)
Accidentally shorting our engine’s starter motor with a wrench, resulting in A) the engine turning over (while I was laying on top of it), and B) a good-sized burn on my arm as a temporary momento. Jonny and Matt both mentioned it might be a good idea to disconnect the batteries next time. Who knew?
Why is there water coming out of our cabinets???
We overfilled the water tanks and water came out of the vent hose which is nicely positioned in the cabinets right above the brand new stereo we just installed. When I looked over and saw our new radio hidden behind a waterfall I was extremely confused.
How many grommets does it take to secure a windlass cover?
The boat originally had 5, but Jonny determined that the best answer was 12. We can be assured that our new windlass cover will not be lost overboard. Ever. (n.b. the cover for our entire mainsail only has 8 grommets.)
How many hundreds of dollars of epoxy and hundreds of hours of time does it take to build and fiberglass wooden water tanks??
Roughly $1200 and 300 hours. We are now thoroughly convinced without one shred of doubt that we should have never torn apart our steel water tanks and we should have hired a welder instead.
Is it possible to start your engine with your arm and an errant wrench?
Yes. Jon freaked out when he was laying on top of the engine, working on the fuel filter, when he unexpectedly received a painful burn and the engine started cranking underneath him. Thereby accidentally discovering how to short the starter solenoid.
Why is water squeezing up from between our floorboards when we walk around?
Jury hasn’t yet returned a verdict on this one. Most likely explanation is a defective foot pump. No matter what, I can tell you this: it will require at least three more trips to the chandlery, approximately $1000 in unforeseen expenses, two gallons of epoxy, 300 rubber gloves, two days of sanding, and a whole lot of work we didn’t anticipate.
I feel that this event merits a second, more detailed telling.
Here’s how it went down from my viewpoint: I’m standing in the galley at about 10pm, all is quiet and still in the marina, and I’m lost deep in thought about why our engine refuses to start (which was a long, unproductive, confusing thought). Somewhere deep in my subconscious I noted a strange sucking, airy sort of sound, but my reverie was deep and this sound failed to warrant my attention . . . So I’m still deep in thought for another minute, when I notice something extraordinarily strange at the edge of my vision. A sheet of water about 2 ft wide has emerged from underneath one of our cabinets, at head height, and is pouring over the drawers onto the settee. On its way from cabinet to settee, it also happens to be passing over our newly installed stereo. And this is no drip. It’s a veritable waterfall. I mean volume. Like the rate at which one could empty a pitcher–quickly. This sight is so astoundingly implausible that my mind refuses to react to it with anything more than a grunting, guttural, medium-volumed “wha??”
The situation is clearly dire–I mentioned that it was pouring over the front of our new stereo–but I was just . . . confused. All I could think of, over and over again (like 15 times in 2 seconds), was “where could it be coming from where could it be coming from where could it be coming from where is the water coming from water there what coming from where where what why why?” Or something roughly like that. Fortunately, Jon new exactly where the water was coming from and sprung immediately into action–Jonny said that his exit out the companionway and into the cockpit demonstrated record-making speed and efficiency of motion, as he sprung from the middle step to the dodger handhold and swung himself smoothly into a upright run for the dock. Jon knew where the water was coming from because Jon was the one that turned on the hose full-blast to fill our freshly finished watertanks. The amount of water that comes out of the faucet on our dock could quench a house fire, and Jon had it at 100%. So Jon knew exactly what enormous volume of water was being pumped into our cabinet–via, it turns out, the tank’s vent hose. Which is why Jon won first place boat move while I stood dumbly staring at the waterfall coming out of our cabinet.
This is what happened: Jon was watching the level of water rise through the (closed) access hatches on top of the tank. The fact that they were closed was relevant. The vent outlet does not come out of the very highest point of the tank, but is about 1″ down the side. We thought that we were safe because the vent hose was routed to a point about 5 feet above the tank. This would be true if even one of the access hatches had been open–in that case the water would have found its own height in the vent hose while air was pushed out of the open access hatch. But since the hatches were closed, as soon as the level of water rose above the vent outlet, the extra 2 inches of air space above the water was irrelevant, as the air no longer had anywhere to escape to. So we forced that water out of the top of the vent house, from where it proceeding to pour under the doors of the cabinet, into the drawer beneath the cabinet, around our stereo, and onto the settee. We put an inch of water in the drawer before Jon turned the water off. Preliminary investigations suggest that the stereo may be just fine, saved from certain death by the water collection properties of the drawer.
Lesson learned: waterproof everything. On a sailboat, even the safest, driest corners of the boat will see water.
It was 1 AM, and I’d been working for 17 straight hours on our damn water tanks. The hose we’d bought was inflexible yet annoyingly curvy, and slightly larger than our old hose, making it extremely difficult to shove it onto the fittings. One fitting that was supposed to attach to the water inlet hose was so tight that I spent 20 minutes, splayed out on the floor, with my arms scrunched into a tight crevice between the water tank and a bulkhead, struggling, pushing, pulling, leverlng, to no avail. Swearing seemed to be called for.
All I wanted was to get one step closer to finishing our new water tanks, a battle that by then was stretching into its third week. By now the project was so consuming that I was forgetting to eat meals. Even though we were now so close to the end, I still felt defeated and resigned to failure. “I can’t do it,” I said to Matt, and I’m not sure if I meant this particular hose fitting or the entire god-forsaken sailboat fixer-upper nightmare I’d gotten myself into.
Matt had showed up at 8:00 that morning, chomping at the bit to do some work after too long away from the boat. July 4th was only a few days away, and we figured that if we wanted to take friends sailing around the Bay to watch the fireworks, we’d have to wrap up the watertank project at long last. While some might call this overly optimistic, I prefer to think of it as inspirationally motivating. Matt called it stressful. He was going to make a go at it though.
I stared at the water inlet hose with disdain, then turned to Matt. He’d gotten the hose on the other tank attached somehow. How? He shrugged his shoulders. “Yeah, mine was a bitch also.” I had put this type of hose on many other fittings, but every other time I’d always had more room to twist the hose around the fitting, following the grooves of the hose, and greatly helping it along. How could I twist it now in such a small space? Ah! An epipheny! Detach the fitting from the tank, connect the hose on the fitting, then reconnect the fitting with the hose on it. It almost worked… except for the enormous kinks that ended up in the hose. So I tried again, kinking the hose in the opposite direction before starting. Success! By 3 AM I was screwing on the last hose-clamp, meaning the water tanks were completely fitted.
Before calling it a night, Matt and I had a beer. We didn’t say much; we mostly just looked at the water tanks, which were shiny and waterproof and strong and at long last permanently bolted in place. We knew that after 19 hours, just as much or more work was still needed to be done to sail by the 4th. But beneath the exhaustion and frustration there was still a moment of satisfaction. The god-forsaken sailboat fixer-upper nightmare seemed, at least, an inspired god-forsaken sailboat fixer-upper nightmare.
I’m here! After months and months of anticipation, I’m at the boat, eager and excited, a teenager at prom. It’s especially exciting, because for months I’d been listening to Matt and Jonny talk about everything they were doing with the boat, and I felt so left out, missing great adventures and stories, and wanting so desperately to be there. It was agony; but no more. The first night in Emeryville, Matt filled me in on some projects that I could get started on. We needed to create lifelines, he said, by lashing skinny lines around thicker lines. We needed to remove the ineffective and messy sound insulation in the engine room, probably by using a putty knife. Also, the old resin in the bottom of the bilge needed to be chipped smooth; for this Matt recommended a wood chisel. Easy enough, I thought: lashing, putty knife, wood chisel. No problem.
The next morning, I sprung awake at 7:30, earlier than I get up when working during the school year. I went looking through the tool bin for the various equipment Matt mentioned. Lashing: check. Putty knife: check. Wood chisel… huh. I found about 5 chisels but none of them was a wood chisel. So I put that off, and busied myself taking off the sound insulation. I finished that by 11:00, had lunch, and then wrapped up my last little bit of schoolwork, and submitted my stundents’ final grades. I met Matt back at the boat that evening and he asked what I had managed to accomplish. “I took off all the sound insulation, and started looking at the lashings, but I couldn’t find any wood chisels.” Matt seemed confused, and glanced down at our array of tools. “What are you talking about,” he said, while picking up a chisel and showing it to me, “there’s four of them right here.” I grabbed the tool from his hand and inspected the chisel more closely. “This is made of metal!” I sputtered. “You said a wood chisel!” Matt just laughed and laughed, and I’ve laughed at myself quite frequently since. Oh well, I suppose someone has to do stupid goofs like this.